Subtitle: Stop the bulk. Learn the “master fold” that pros use. From the perfect headband to a non-bulky neckerchief, we’ll fix all your folding problems.
If you’re Googling “how to fold a バンダナ,” you’ve probably been in this exact situation:
You try to copy a look from a magazine, but your fold ends up thick and bulky. Tied around your neck, it looks like a bib. On your head, it’s either way too wide or just… a mess. It’s nothing like the “style” you were going for.
Sound familiar?
Yep. Welcome to the club. This is what happens to 90% of people.
The problem is simple: You’re copying the final style but you haven’t mastered the foundational fold. What makes a bandana look good isn’t the tie, it’s the fold.
This guide skips the useless methods and gets straight to the two pro-level techniques you actually need. They’re the master keys to unlocking pretty much every bandana style out there.
01. The Master Method: The Basic Strip Fold
This is the most important fold you will ever learn.
It’s the foundation for almost all fashion styles (headbands, neckerchiefs, wristbands). Once you get this, you’ve solved 80% of the “bulky” problem. We’ll use a standard 22×22 inch (55x55cm) bandana.
Step 1: The Triangle
- Lay your バンダナ flat on a clean surface, but turned so it looks like a diamond (one point facing you).
- Grab the far point and fold it down to meet the point closest to you.
- Now you have a big triangle.
Pro-Tip (E-E-A-T): Why not just fold it square-to-square? Because starting with the diamond offsets the fabric edges. This is step one to avoiding that thick, lumpy knot everyone hates.
Step 2: Fold the Tip
- Find the tip of the triangle (the one you just folded down).
- Fold that point up so its tip just touches the middle of the long, flat edge.
Step 3: The Roll (or Fold)
- Now, fold the long, flat bottom edge up one time, covering the little tip you just tucked in.
- その width of this fold is everything.
- Real-World Example: If you want a slim choker or wristband, you need a narrow fold, about 1.5 inches (4 cm) wide.
- Real-World Example: If you want a classic headband, you can go wider, like 2.5 – 3 inches (7 cm).
Step 4: Finish the Strip
- Keep folding up, using that same width, until you have a clean, flat strip.
- You’ll see that all the messy, raw edges and points are perfectly hidden inside.
02. How to Use It: 3 Classic Styles from the “Basic Strip”
Now that you have a perfect, flat “master strip,” it’s time to use it.
Style 1: The Classic Headband
- The Fold: Use the “Master Method” to make a 3-inch wide strip.
- How to Tie It:
- Hold both ends, and place the center of the strip on the back of your head, right under the bone (the occipital bone).
- Pull the ends up to your forehead and tie a solid double knot right at your hairline.
- You can tuck the “tails” in, let them stick up (the “bunny ear” look), or just let them hang naturally, like the Jennie Earle guide shows.
Style 2: The Frenchie / Choker
- The Fold: This is the one that takes the most skill. Use the “Master Method” to make a very narrow, 1.5-inch strip. This is the key to making it look cool and not bulky.
- How to Tie It:
- Wrap the strip around your neck with the center in the front (at your throat).
- Cross the ends behind your neck, then bring them back to the front.
- Tie a small, neat knot off to the side on your collarbone (don’t put it right in the middle).
Style 3: The Wristband
- The Fold: Same as above. Make a narrow strip.
- How to Tie It:
- Place the center of the strip on your inner wrist.
- Criss-cross the ends around your wrist 1-2 times.
- Tie it off on the outside of your wrist and tuck the extra tails into the wrap.
03. The Other Core Method: The Triangle Fold
This one’s way easier. It’s common for workwear, retro, and outdoor styles.
Step 1: Lay your バンダナ フラット。 Step 2: Fold one corner to the opposite corner to make a big triangle. That’s it. Seriously, you’re done.
Style 4: The Neck Scarf (Workwear Style)
- The Fold: Use the “Triangle Fold.”
- How to Tie It: Place the triangle on your chest (point down, like a bib) and tie the ends behind your neck. This is the classic retro workwear look.
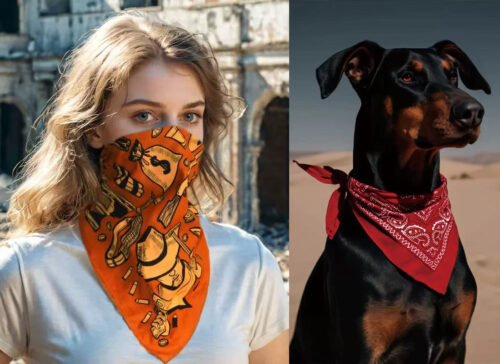
Style 5: The Bandit / Face Covering
- The Fold: Use the “Triangle Fold.”
- How to Tie It: Place the triangle over your lower face (point down), and tie the ends behind your head. Then, just pull the top edge up to cover your nose and mouth.
FAQs (Answered by a Pro)
Q: Why does my bandana fold always look so bulky and thick? A: 90% of the time, it’s because you’re not using the “Basic Strip Fold.” If you just randomly fold the square in half and in half again, all the fabric edges pile up in one spot. The “Master Method” (starting with the diamond and tucking the tip) staggers the fabric so it lays flat.
Q: My bandana is too stiff to fold. A: That’s actually a good sign. It means you probably got a high-quality cotton bandana. Like we mentioned in our last article, they come starched and very stiff from the factory. Just wash it a few times. It’ll get super soft and be perfect for folding.
Q: What size bandana should I buy? A: 22×22 inches (55x55cm) is the classic, do-it-all size. If you want to wear it as a full hair scarf or tie more complex knots, you can go up to 27×27 inches (70x70cm) or bigger.
By mastering these two core how to fold a bandana techniques, you can confidently pull off any style and turn a simple square into your go-to accessory.