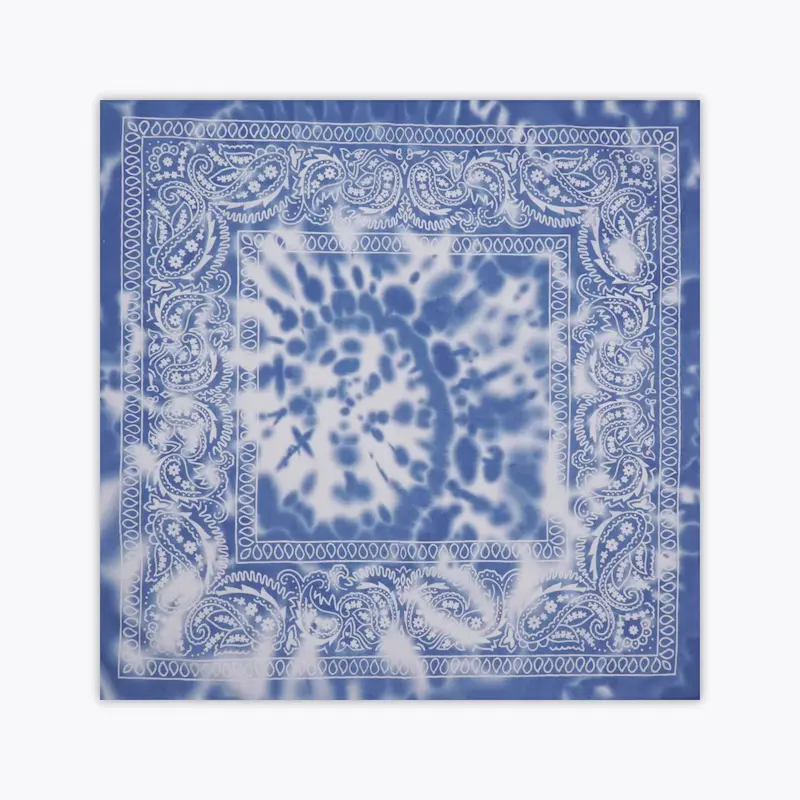
Batikovaný šátek jsou módním a personalizovaným doplňkem, který se v posledních letech stal populárním v pouličních trendech, hudebních festivalech a každodenním nošení. Díky svým barevným a jedinečným vzorům je každý kus jedinečným uměleckým dílem. A co je důležitější, náklady na výrobu batikovaného šátku jsou nízké, materiály jsou snadno dostupné a lze jej vyrobit doma.
Tento článek vás krok za krokem naučí, jak si vyrobit batikovaný šátek. Nejsou potřeba žádné zkušenosti. Příprava trvá pouze 30 minut a snadno si můžete vyrobit svůj vlastní personalizovaný čtvercový šátek. Ať už jste v ručních pracích začátečník nebo chcete vyrobit speciální dárek pro přítele, tento jednoduchý a zábavný projekt vám umožní rychle začít a užít si zábavu z tvoření.
2. Materiály, které budete potřebovat
Pro úspěšné vyrobení barevného a průhledného batikovaného šátku si musíte připravit následující jednoduché a snadno dostupné materiály:
Bílý nebo světlý bavlněný čtverec nebo šátek: Doporučuje se zvolit bavlněný materiál 100%, který je vysoce savý, snadněji absorbuje barvivo a je barevnější. Nejvhodnější je obvykle rozměr 22×22 palců (přibližně 56×56 cm).
Sada pigmentů pro tie-dye: Doporučuje se používat reaktivní barviva Procion MX, která mají bohatou barvu, vysokou odolnost a snadno nevyblednou při vystavení vodě. Můžete si také vybrat komerčně dostupné sady pro tie-dye, které obsahují různé barvy a nástroje.
Plastové rukavice: Chraňte si ruce před barvením a nezapomeňte je při práci s barvivem nosit.
Plastové sáčky nebo plastová fólie: Používají se k zabalení obarveného šátku, aby se udržela vlhkost a barvivo plně reagovalo a zafixovalo barvu.
Gumičky nebo bavlněné provazy: Používají se k ovázání látky a vytváření různých vzorů. Gumičky střední tloušťky jsou vhodnější pro svazkování.
Plastové tácy nebo staré talíře: Používejte je jako pracovní plochy, abyste zabránili kontaminaci desky stolu barvivy a usnadnili čištění.
Rozprašovač nebo malý kelímek/kapátko: Používá se pro přesné barvení. Rozprašovače jsou vhodné pro gradientní efekty a malé kelímky s kapátky umožňují kontrolovat umístění kapek barviva.
Fixační činidlo (uhličitan sodný/kalcinovaná soda): Před barvením látku namočte, aby se otevřela molekulární struktura vláken, lépe se barvivo přichytilo a zlepšila se trvanlivost barvy. Obecně se přidává 1/2 šálku kalcifikované sody na litr vody.
3. Přípravné kroky
Než začnete s barvením technikou tie-dye, je pro zajištění jasných a pevných barev klíčová správná příprava. Postupujte prosím podle následujících kroků:
Vyperte šátek: Bílý nebo světlý bavlněný šátek jednou vyperte čistou vodou s malým množstvím pracího prostředku, abyste odstranili zbytky nebo povlak z výrobního procesu. Tento krok může výrazně zvýšit schopnost látky absorbovat barviva a zabránit nerovnoměrnému barvení.
Připravte si vodný roztok sody: Do velké nádoby nalijte asi 1 litr teplé vody, zalijte půl šálku (asi 120 gramů) uhličitanu sodného (sody) a míchejte, dokud se zcela nerozpustí. Dbejte na větrání, abyste zabránili vdechnutí prášku. Vypraný šátek ponořte do roztoku na přibližně 60 minut. Čím delší je doba, tím více se vlákna otevřou a tím lepší je efekt fixace barvy.
Vyždímejte šátek: Po namočení si nasaďte rukavice, vyjměte šátek a jemně vyždímejte přebytečnou vodu. Nemusí být úplně suchý, stačí ho udržovat vlhký, což lépe pronikne do barvy. V tomto okamžiku je šátek hotový a můžete přejít k dalšímu kroku – uvázání tvaru.
4. Techniky vázání vzorů
Vázání je klíčovým krokem při určování vzoru batikovaného nátěru. Různé metody skládání a vázání vytvářejí jedinečné vzory. Zde jsou čtyři klasické techniky vázání, které se snadno naučí a jsou vhodné pro začátečníky:
1. Spirálový vzor: Položte šátek naplocho na stůl a jemně jej otáčejte od středu prsty nebo tužkou, abyste jej srolovali do ploché spirálové placky. Poté jej pomocí gumiček zkřížte a svažte od středu na 6 stejných částí, abyste zafixovali tvar. Po obarvení bude mít klasický spirálový vzor, který je velmi vhodný pro symetrické tvary.

2. Vzor pruhů: Začněte v jednom rohu šátku a opakovaně jej přehněte jako vějíř do dlouhého proužku širokého asi 2 cm. Pomocí gumiček svážete jednu po 2-3 cm. Čím hustší jsou pruhy, tím tenčí jsou. Během barvení se mohou prolínat různé barvy a vytvářet radiální nebo rovnoběžné pruhy.

3. Kruhový vzor (vzor terč): Sevřete střed šátku prsty a zvedněte ho, přičemž zbytek čelenky nechte přirozeně viset. Poté pomocí gumiček pásky svisle svažte každé 2–3 cm, abyste vytvořili strukturu podobnou klobáse. Barvivo stéká shora a vytváří tak efekt soustředných kruhů.

4. Vzor zmačkanosti: Šátek náhodně zmačkejte a volně jej zajistěte provázkem nebo gumičkami. Tato metoda nevyžaduje přesné ovládání a je vhodná pro uživatele, kteří chtějí abstraktní, oblačné textury, a efekt je pokaždé jedinečný.

5. Aplikace barviva
Aplikace barviva je nejzajímavější částí procesu batikování. Zvládnutí této techniky může vzor zpestřit. Postupujte prosím podle následujících kroků:
Používejte plastové rukavice: Chraňte si ruce před zabarvením a nezapomeňte je nosit po celou dobu operace.
Příprava nádobek s barvivem: Nalijte různé barvy barviva do malých kelímků, kapátek nebo rozprašovačů, abyste mohli přesně kontrolovat množství. Pro každou barvu používejte samostatné nástroje, abyste zabránili smíchání barev a kontaminaci.
Začněte s barvením: Položte uvázaný šátek naplocho na plastový tácek a stříkejte nebo nakapejte barvu shora nebo z okraje. Zaměřte se na vyčnívající části záhybů a nechte barvu přirozeně proniknout do mezer. Dbejte na to, abyste nechali prázdná místa, abyste zvýšili vrstvení a prodyšnost vzoru.
Zajistěte úplné probarvení: Otočte šátek a stejným způsobem obarvte i rubovou stranu, zejména silné uzly, a pro zajištění probarvení je potřeba více kapek barviva. Po úplném probarvení by měla být látka vlhká, ale ne nasáklá vodou.
Doporučené barevné schéma:
Studené tóny: modrá + fialová (snový gradient)
Teplé tóny: červená + žlutá (efekt západu slunce)
Kontrastní barvy: zelená + modrá nebo růžová + azurová (silný vizuální efekt)
Pro začátečníky se doporučuje použít 2–4 barvy, aby se zabránilo smíchání a zašpinění.
6. Fixace barviva
Po barvení musí barvivo plně reagovat s bavlněným vláknem, aby se zajistilo, že barva bude pevná a nevybledne.
Obarvený šátek jemně srolujte nebo přeložte, uzavřete ho do plastového sáčku nebo jej pevně zabalte do plastové fólie, abyste zabránili odpařování vlhkosti.
Nechte působit při pokojové teplotě 6-8 hodin a pro dosažení co nejživějšího a nejtrvalejšího barevného efektu se doporučuje nechat působit přes noc (12 hodin).
Během skladování se vyhýbejte přímému slunečnímu záření a vysokým teplotám. Udržování vlhkosti pomůže barvivu plně proniknout a zafixovat barvu.
7. Opláchnutí a sušení
Po dokončení fixace barvy přejděte k fázi čištění:
Při stříhání nebo odstraňování gumičky noste rukavice a šátek opatrně rozložte.
Nejprve opláchněte studenou vodou pod tekoucí vodou a jemně vymačkejte, abyste odstranili plovoucí barvu, dokud proud vody nebude prakticky čistý.
Přepněte na teplou vodu a pokračujte v oplachování, přidejte malé množství neutrálního pracího prostředku a jemně třete 1–2 minuty, abyste zcela odstranili zbytky barviva.
Neždímejte to silně, abyste nepoškodili vzor. Přebytečnou vodu můžete odsát ručníkem.
Šátek položte naplocho nebo ho pověste na větrané místo, aby přirozeně uschl. Vyhněte se slunci, abyste zabránili vyblednutí v důsledku ultrafialového záření.
Po úplném zaschnutí můžete zezadu vyžehlit na nízkou teplotu, což pomůže zafixovat tvar a zlepšit texturu.
8. Tipy pro použití a péči
Aby vám šátek barvený technikou batikování vydržel dlouho a byl krásný, věnujte prosím pozornost následující denní péči:
Doporučuje se jej před prvním nošením jednou vyprat. Protože se na začátku může objevit mírné odlupování barvy, perte jej odděleně, abyste zabránili znečištění jiného oblečení.
Pro každodenní použití se dá obrátit naruby, čímž se sníží tření na přední straně a prodlouží se životnost vzoru.
Při čištění se upřednostňuje ruční mytí ve studené vodě a jemném pracím prostředku. V případě praní v pračce vložte prádlo do sáčku na prádlo a perte odděleně.
Je přísně zakázáno používat bělidlo nebo silný alkalický prací prostředek, který rychle zničí barvu.
Při skladování se vyhněte vlhkému prostředí, abyste zabránili dlouhodobému kontaktu s barvivy a způsobili reverzní osmózu.
9. Závěr
Výroba batikovaného šátku vlastní výroby je jednoduchá a zábavná. S malými penězi si můžete vytvořit jedinečné dílo. Vyzkoušejte různé způsoby vázání a sladění barev, buďte kreativní a vyrábějte si vlastní smysluplné dárky. Obzvláště uspokojující je darovat je ostatním nebo je používat sami.
10. Často kladené otázky
Jak si vyrobit batikované šátky?
Namočte bavlněný šátek do uhličitanu sodného, zatočte ho nebo přeložte, naneste barvivo pomocí lahviček nebo sprejem, nechte působit 6–8 hodin, poté opláchněte a osušte.
Jak se nazývá šátek/šátek na vázání?
Běžně se tomu říká bandana, šátek na šátek nebo uzel šátku, když se nosí kolem krku jako kravata.
Proč si lidé vážou šátky?
Lidé nosí zavázané šátky kvůli stylu, ochraně před sluncem, absorpci potu, kulturnímu vyjádření nebo jako módní doplněk v hudbě, sportu nebo při outdoorových aktivitách.
Jak použít šátek jako kravatu?
Přeložte ho do trojúhelníku, srolujte od delšího okraje do proužku, konec provlékněte pod a skrz smyčku vpředu – jako kravatu – nebo ho jednoduše zavažte u krku.
